In this post we use KIAUH to install Klipper firmware on a Flying Bear Reborne2 3D printer with the stock Makerbase Nano6 v3.2 (MKS Robin 3.x variant) controller board. This is a stock Flying Bear Reborn2 3D printer with no modifications.
We will need to clone KIAUH to a git directory using:
git clone https://github.com/th33xitus/kiauh.gitBuilding Klipper firmware on stock Flying Bear Reborn2
To build the firmware run KIAUH and select '4) [Advanced]‘ then ‘2) [Build only]‘.
NOTE: The Makerbase Nano6 v3.2 controller board can not be flashed over USB. We will have to build the firmware with KIAUH and use a SD card flash the controller board. The nice thing with Klipper is that we only have to flash the controller board once as configuration changes do not require reflashing.
We should see the ‘Klipper Firmware Configuration‘ screen:

To configure a Flying Bear Reborn2 with the stock Makerbase Nano6 v3.2, which seems to be a MKS Robin Nano 3.x variant, controller board. To build the Klipper firmware for the controller board do the following:
- Select ‘STMicroelectronics STM32‘ as the Micro-Contoller Architecture
- Select ‘STM32F407‘ as the Processor model
- Select ‘48KiB bootloader (MKS Robin Nano V3)‘ as the Bootloader offset
- Select 'USB (on PA11/PA12)‘ as the Communication interface
Select ‘Q‘ to quit and ‘Y‘ to save the interface and build the firmware image.

Once the firmware finishes building this point we can exit out of KIAUH.
Installing Firmware on Flying Bear Reborn2 with Makerbase Nano6 v3.2
KIAUH will build the firmware image in a separate Klipper GIT repository that it cloned to on the local system as part of the build process. The cloned Klipper directory is located in the home directory of the user running KIAUH.
From the system where klipper firmware is built, copy the file <klipper_git_directory>/out/klipper.bin to the root of a FAT formatted SD card. Then, on the SD card rename the klipper.bin file to Robin_nano_6.bin <– NOTE: If you do not rename the firmware file it will not get flashed on to the MCU.
Make sure the Flying Bear Reborn2 3D printer is turned off, insert the SD card and power on the printer. You will hear a beep and see some firmware update information in a green font on the LCD as new firmware is flashed on to the Makerbase Nano6 v3.2 controller board. Flashing is pretty quick as the Klipper firmware is minimal and not that big in size.

Once the firmware finishes flashing the screen will show ‘100% Complete‘ with a green bar across the screen. At this point turn off the printer and then turn it back on. We will hear a beep but the screen will stay blank, this is normal as all control is now done the Mainsail web interface.
NOTE: The MKS TS35-R v2.0 TFT display will not longer be usable when using Klipper. This is not a huge loss for us as we have a dedicated monitor on the host running the host computer and we also connect from a phone/tablet/laptop to the Mainsaill web interface. Though we will be on the lookout for Klipper updates to see if support is added for this display.
Rollback to stock Marlin 2 firmware
Should things go wrong we can rollback the firmware on the Makerbase Nano6 v3.2 controller board. Flying Bear has a copy of the stock Marlin 2 firmware for the Reborn2 3D printers and instructions here.
Connecting to the Klipper firmware via Mainsail
Now that we have the Klipper firmware running on the Flying Bear Reborn2 3D printer, we need to connect a host computer to it to control the 3D printer. This is where the power of Klipper comes into play as it uses the host computers faster resources ( i.e. CPU/GPU/RAM/IO ) to do the gcode math for our prints. Mainsail is the web interface we at Meowfire use to configure Klipper to control the 3D printer and stream ( via USB ) gcode to the 3D printer.
If you do not have a host system running Klipper and Mainsail, this post may help – Installing Klipper on Ubuntu.
To configure the Flying Bear Reborn2 3D printer running Klipper firmware, point a web browser to the host system running Mainsail. We will have to enter an IP:port for for the instance ( if running multiple 3D printers on one host computer ).

Then click on the left tab labeled ‘Machine’ and double click on the file ‘printer.cfg’. This will open up the config file in a web based editor that Mainsail provides.

Mainsail communicates to the controller board via a USB serial interface. Each controller board will have a unique MCU ID. To find this ID run the following command on the host that is connected via USB to the 3D pritner: ‘ls /dev/serial/by-id/*'
If there are more than one 3D printer connected to the host, run the above command first with the new 3D printer off and the USB cable unplugged. This will show the MCU ID’s for the existing 3D printers.
Then make sure the new 3D printer’s USB cable is plugged in, turn on the 3D printer and run the command again. The new MCU ID that shows up is the new 3D printer. An example of what should appear:
/dev/serial/by-id/usb-Klipper_stm32f407xx_290037001050303448303120-if00Update the printer.cfg file with the full path that looks something like this:
serial: /dev/serial/by-id/usb-Klipper_stm32f407xx_290037001050303448303120-if00Once we have the the MCU ID copy the sample config and macro files found at:
https://gitlab.com/meowfire_public/3d_printer_configs/-/tree/main/Klipper/Flying_Bear_Reborn2
To the respective printers <printer_data>/config/
Under the ‘Machine‘ tap, right click on the printer.cfg file to open it for editing in the Mainsail web based text editor.
Find the line in the ‘[mcu]‘ section that starts with ‘serial:’ and replace it with the output for the new 3D printer from the output of ‘ls /dev/serial/by-id/*‘ on the system.

The above printer.cfg file is a starting point as it has conservative acceleration settings for a Flying Bear Reborn2 using the Makerbase Nano6 v3.2 controller board. If we want to push our Flying Bear Reborn 3D printer faster and risk skipped steps ( as the steppers are not closed loop ) we can increase the settings in ‘[printer]‘ section of the printer.cfg file. We can easily increase these settings realtime from the Mainsail web interface.
Once we are finished editing the file we click 'Save & Close‘. Then make sure the Flying Bear Reborn2’s 3D printer’s USB is connected to the host computer and turn on the 3D printer. We should hear a beep from the printer.
After a few seconds Mansail should connect to the new 3D printer. If this fails, go to the ‘Dashboard‘ tab in Mainsail for the 3D printer and click ‘Firmware Restart‘ button in the dashboard. This will cause the the 3D printer to beep and then we should see it communicating with the Mainsail via USB:

If for some reason we are not able to see the above screen, make sure that the USB cable is attached completely to the 3D printer and host system. The Klipper logs may have some clues to underlying issues.
Tuning the Klipper on the Flying Bear Reborn2 3D printer
Due to variances in manufacturing of components, each 3D printer is slightly different and the following steps will tune the configuration to match the 3D printers hotend, heated bed and steppers. The nice thing is that Mainsail and Klipper do most of the work. We already did the hard part getting Klipper running on the Flying Bear Reborn2 3D printer. Now it is time to get it dialed in.
Initial homing of the printer
Nothing will happen in Mainsail until we tell it to home the X, Y and Z axis. To home the printer click on orange Home button in the ‘Toolhead‘ areas of the Mainsail dashboard. Once homing is complete the motion controls will turn blue. At this point we can move the extruder using the buttons or enter a number in the X,Y or Z boxes.

Set hotend PID
To compensate for variances in the hotend’s heating element and thermistors we have Mainsail heat up the hotend over a period of time and have it calculate the P, I, and D values on the extruder. This will minimize any heating element temperature fluctuations and prevent unnecessary extra layer lines on 3D prints.
To get the P, I, D values run the following command in the ‘Console‘ area in the Mainsail dashboard :
PID_CALIBRATE HEATER=extruder TARGET=220
It will take about 10 minuets for the PID calibration to complete, we can watch the extruder heat up and cool down in the ‘Temperature‘ area in the Mainsail dashboard. Once the calibration process is finished the ‘Command‘ area will have the results:
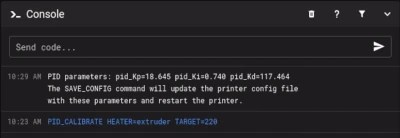
To update the Flying Bear Reborn2’s printer.cfg file run the command ‘SAVE_CONFIG‘.
We should run this process when ever we change out the hotend, heating element or therimster.
Set heated bed PID
Getting the PID settings for the heated bed is similar to the extruder process.
Run the command:
PID_CALIBRATE HEATER=heater_bed TARGET=80Wait 10 minuets for the process to complete and then run the command ‘SAVE_CONFIG‘
We will need to run this process if ever we change the heated bed or apply some top layer.
Bed leveling and Z offset
WARNING: Before performing bed leveling for the first time with new Klipper firmware on the Flying Bear Reborn2 3D printer, we must lower the heated bed to it’s lowest point by turning all 4 leveling wheels fully clockwise. If we do not do this, the print head will most likely stall the Z steppers as it crashes in to the bed.
Since the stock Flying Bear Reborn2 3D printer has no auto bed leveling, we will have to manually tram the print head to the bed. Mainsail makes this pretty easy as the location of the leveling points are in the printer.cfg. Here is the process we follow:
- Fully lower the heated bed by turning all 4 leveling wheels clockwise as far as they will go. This will ensure that the print head will not crash into the bed on the next step.
- Click on the 3 dots stacked on top of one another to the right side of the ‘Toolhead‘ area and select ‘BED SCREW ADJUST‘

- The ‘Bed Screws‘ dialog box will move the print head over top of the screws so that we can use a piece of paper or 0.1mm feeler gauge to get the print head close, but not touching the print bed.
Adjust the position of the print head and then click ‘ADJUSTED‘. This will move the print head to the next spot. Do this for all 4 spots. - Repeat the above process 3 times and only click ‘ADJUSTED‘. Each time we move a print wheel, as adjusting one wheel will slightly cause one or more points to shift. At the end of the 3rd time we should not have had to adjust any of the points.
If this is not the case do as many adjustments cycles as needed until we get one cycle where we do not need to adjust any wheels. - Once all points are adjusted, click ‘ACCEPT‘ for the the points. Once we click ‘ACCEPT‘ for the last point the window will close.


Once the bed is leveled we will need to do a test print and set the ‘Z Offset’ to get the perfect distance from the print bed for the first layer.
Set pressure advance
Pressure advance will make the 3D prints much nicer and stable. The best way we have found is to fill out this web form with the 3D printer’s settings and print the gcode it produces. Then find the line that is most uniform and enter that value to the right as ‘pressure_advance‘ under the ‘[extruder]‘ section of the printer.cfg file.
We have found that this setting works well for us:
pressure_advance: 0.075And we are done
Compiling, installing and configuring Klipper firmware on Flying Bear Reborn2 with the stock Makerbase Nano6 v3.2 controller took us a few hours to get dialed in, but once we had it up and running, our prints were faster and just as nice as the stock Marlin 2 firmware.